
Radio Tile Guide
The Pilot’s Guide to the Radio Tile
The Radio Tile is your personalized communication hub on the kneeboard. It keeps critical frequencies right at your fingertips, whether you are managing a custom list of airspaces you fly through frequently, or relying on automatic route frequencies loaded from your flight plan.
This guide will walk you through setting up and using the Radio Tile efficiently, taking less than 10 minutes to read.
What Does the Radio Tile Do?
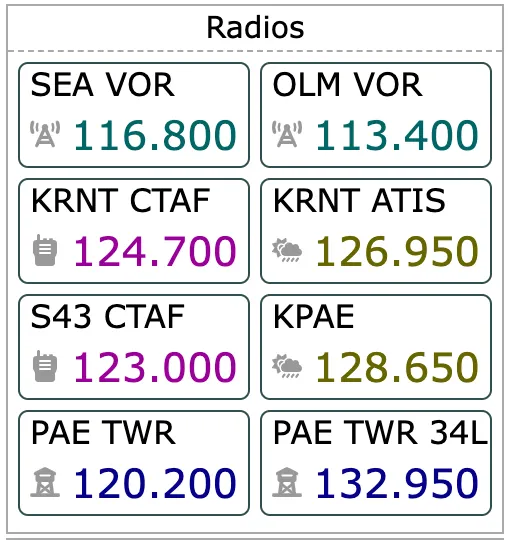
The Radio Tile displays communication frequencies in a clear, high-contrast format for quick reference in the cockpit.
Each frequency box shows:
- Name (e.g., KLAX Twr)
- Frequency (e.g., 120.95)
- Type Indicator (e.g., A colored tag for ATIS, Tower, Ground, etc.)
Tip: You can span the Radio Tile across two spaces on the kneeboard if you need to visualize a larger list of frequencies simultaneously! Radio Tile will merge horizontally when two “Frequencies” tiles are next to one another, resulting in a broader list.
Tile Display Modes
When viewing the Radio Tile on your kneeboard page, it can operate in one of two modes:
- Selected Frequencies: Displays a custom list of frequencies that you manually curate. This is perfect for local training flights or familiar routes.
- Route Frequencies: Automatically fetches and displays all frequencies relevant to the route you have loaded in the app (Departure, Enroute, Destination, and Alternate).
Note: You can easily switch between these formats via the main Tile Settings.
The New Radio Tile Settings: A Complete Overhaul
The Settings menu for the Radio Tile has been completely redesigned to make building your custom frequency list faster and more intuitive.
When you open the Radio Tile Settings, you will see three main sections: Frequency Lookup, Selected Frequencies, and Color Scheme.
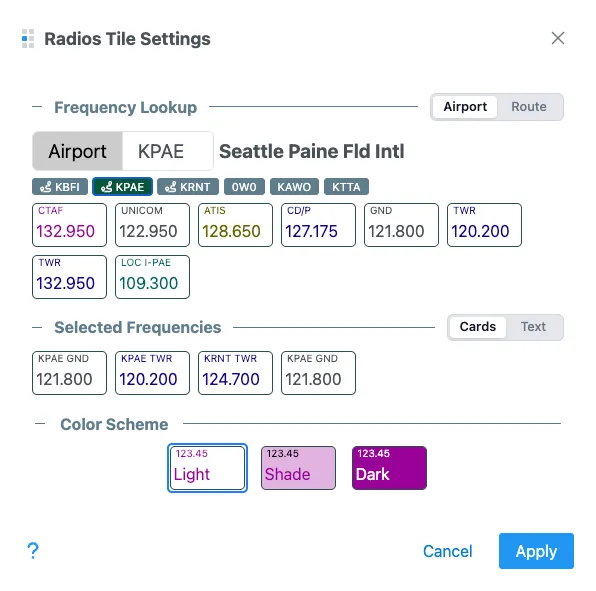
1. Frequency Lookup (Finding Frequencies)
The Lookup section acts as a search engine for adding new frequencies to your custom list. It features two discovery modes:
- Airport Mode:
- Type an airport identifier (e.g., KJFK) into the large input field.
- The input automatically suggests your Home airport, recently used airports, and airports currently configured in your route.
- Once selected, all frequencies for that airport immediately appear below as interactive cards.
- Route Mode:
- Simply toggle to “Route”, and the system instantly pulls every frequency associated with your active flight plan.
How to Add:
When results appear in the lookup area, hover over any frequency card. A blue + icon will appear in the top right corner. Click the card to instantly add it to your custom “Selected Frequencies” list.
2. Selected Frequencies (Managing Your List)
This section shows the custom list of frequencies that will be displayed when the tile is in “Selected Frequencies” mode. This list is always accessible here, even if your tile is currently set to “Route Frequencies”.
You can manage this list using two different interfaces:
- Cards Mode (Visual Grid):
- Displays your customized list as clear frequency boxes.
- How to Remove: Hover over any card in your list to reveal a red
-icon. Click to remove the frequency from your setup.
- Text Mode (Power User):
- Displays your list in raw text format (
Value,Name,Type). - Example:
123.45, KABC Twr, Tower - This mode is perfect for rapid bulk editing or pasting lists built in Excel or Notepad. Any changes made here instantly sync back to Cards Mode.
- Additionally, you can add phone numbers to the list by using the following syntax
{number},{name},Phone. For example:206-214-4722,KAWO CD,Phone
- Displays your list in raw text format (
3. Color Scheme
At the bottom of the settings dialogue, you can customize the aesthetic of the frequency boxes shown on the tile.
- Light: High contrast with a white background.
- Shade: A slightly darker aesthetic that reduces glare.
- Dark: Deep backgrounds for low-light or night flying situations.
Select the one that best matches your kneeboard theme or current lighting environment.
When you are done editing, click apply to save and use the list.
Quick Workflow Example
Imagine you are flying a new cross-country route and want to prepare your Radio Tile:
- Open Radio Tile Settings.
- Go to Frequency Lookup and switch the toggle to Route.
- All frequencies for your planned flight appear.
- Hover over the specific Tower, Approach, and ATIS frequencies you know you’ll need, clicking the blue
+to add them selectively. - Scroll down to Selected Frequencies to verify your list. If you accidentally added a Ground frequency you don’t need, hover over it and click the red
-to remove it. - Hit Apply.
Your personalized, clutter-free radio list is now ready on your kneeboard!
Secondary Modes: Lost Comms and VOR Volumes
The tile secondary purpose is to serve a reference reminder for Lost Communications and VOR Service Volumes. You can access these modes using the display mode button in the upper left corner.
In the VOR Service Volumes mode, you can cycle through VOR types by either selecting a value at the bottom or clicking on the chart.