Anatomy of a Hybrid Cockpit: My 14-Stage Cessna Workflow
In our last discussion, we established that the “hybrid cockpit” isn’t a compromise—it’s a strategy. It is the conscious decision to stop fighting the screen and start using the right tool for the right job.
Today, let’s move from theory to application. This is my actual, battle-tested workflow for flying Cessna 172s and 182s. It relies on three distinct form factors spread across 14 stages of flight. Spoiler alert: the iPad doesn’t win every round. In fact, out of 14 distinct flight stages, 8 are dominated by physical tools.
Here is the breakdown of how to balance workload, build confidence, and maintain a higher level of safety.
The Three Form Factors
Before we start the engine, here is the hardware:
-
Laminated Checklists (Ring-bound): Color-coded, weatherproof, and indestructible.
-
iPad Mini with ForeFlight: The digital powerhouse.
-
Paper Kneeboard: The ultimate quick-reference and active memory tool.

Phase 1: On the Ground
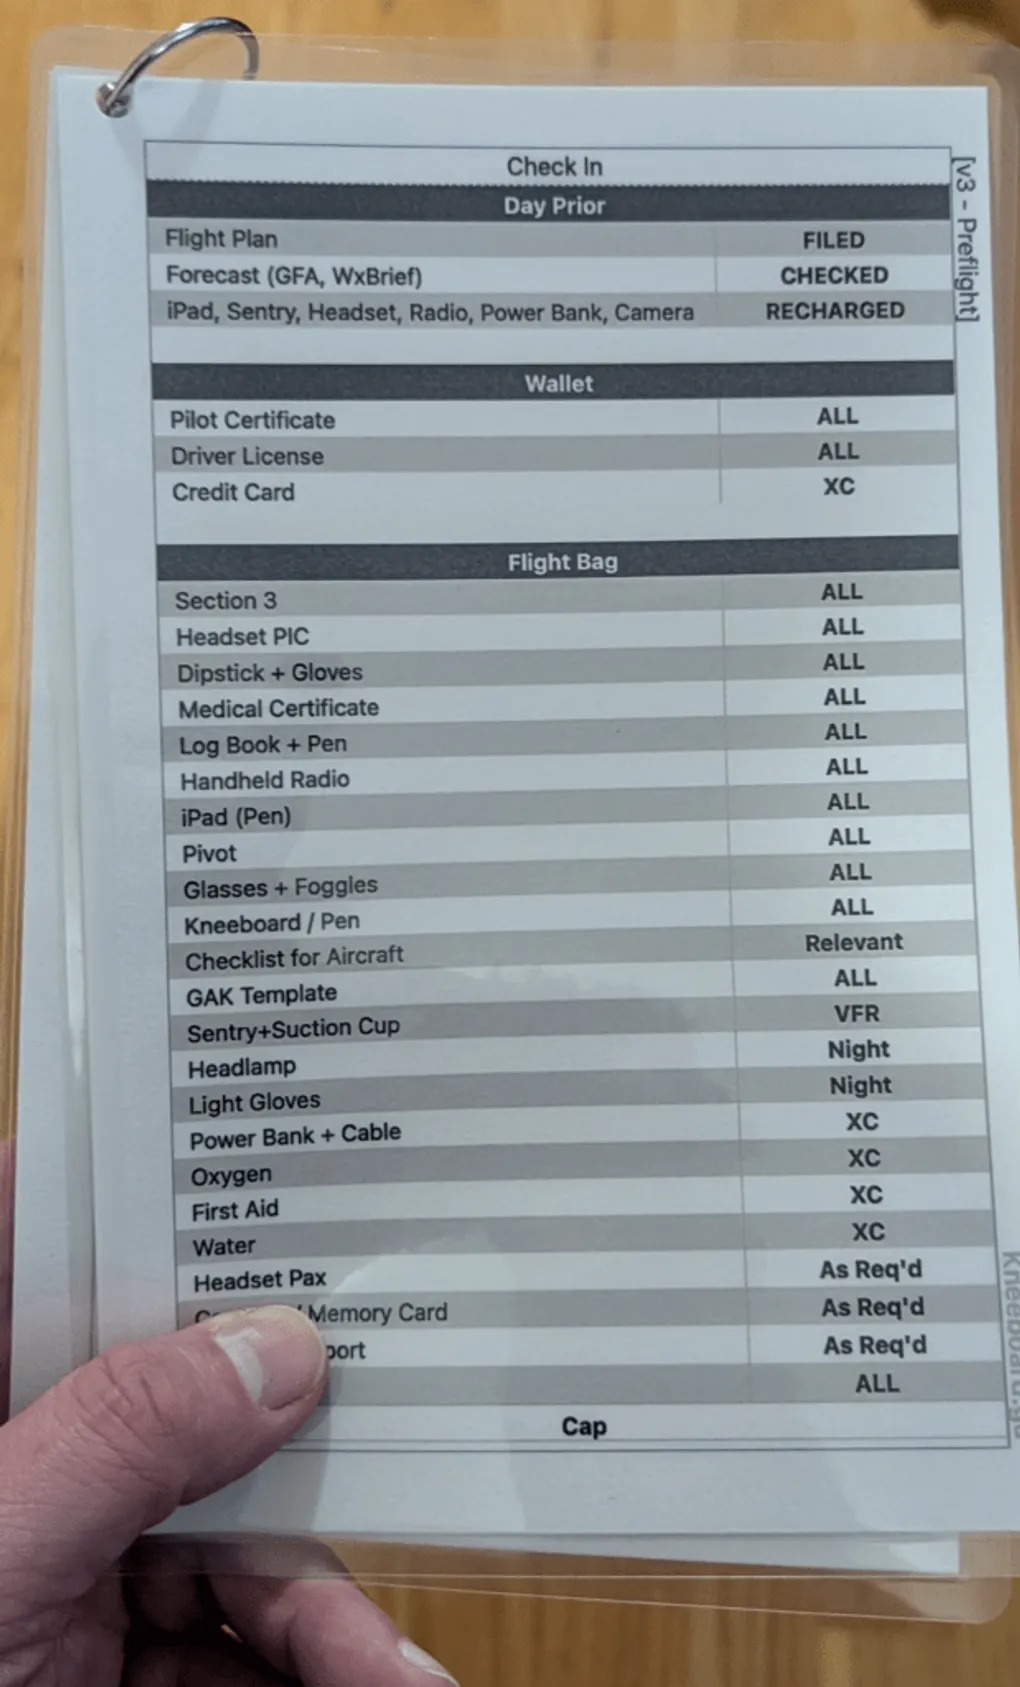
1. Before You Go (Physical: Laminated, Grey Accent) Before I even think about touching the airplane, I run through this grey-accented page. It covers both flight instruction requirements and passenger details. Is it a bit overkill? Yes. But it catches absolutely everything on those days when my brain decides to skip a beat.
2. Preflight (Physical: Laminated, Yellow Accent) This is where the laminated format shines. The iPad stays safely inside the cockpit while I am outside handling tie-downs and checking fuel vents. The laminated card is weatherproof, won’t blow away in a gust, and if a rogue drop of 15W-50 oil drips onto it from the dipstick, one swipe with a tissue makes it good as new. Try doing that with an iPad screen.

3. Cockpit Checks (Digital: iPad) Back inside the cabin, the laminated list goes into the flight bag, and I switch to ForeFlight for the passenger briefing and initial cockpit flows. I will be honest: ForeFlight is not the optimal solution here. Having to toggle back and forth between the digital checklist and other tabs in the app is clumsy, but it gets the job done.
Phase 2: Clearances and Taxi
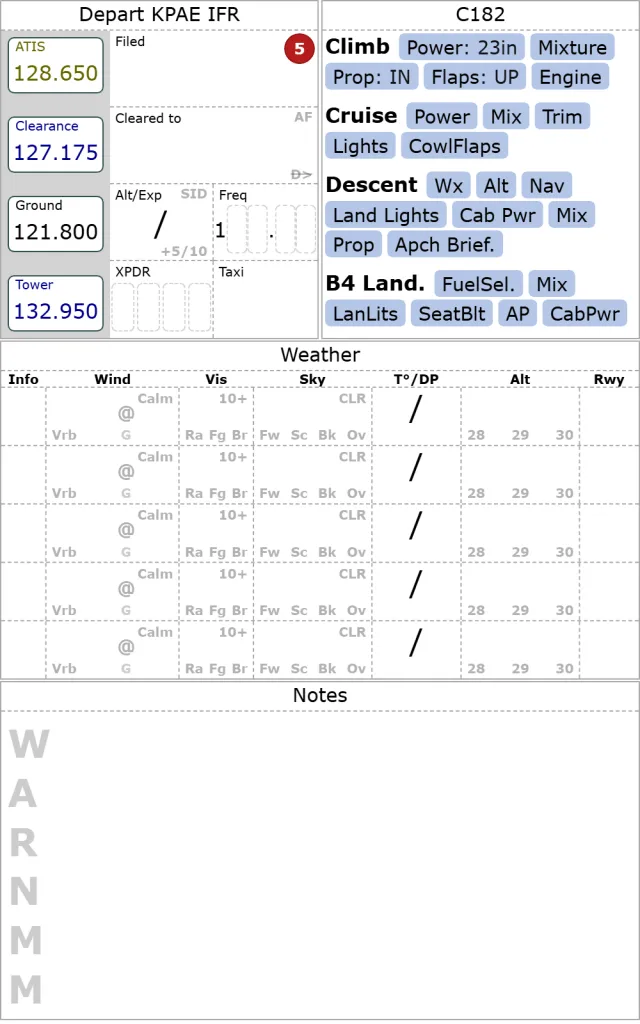
4. Clearances (Physical: Paper Kneeboard) As soon as the radio work begins, the paper kneeboard takes over. It lists all my frequencies of interest in order of execution—a massive brain-cycle saver. When I copy the ATIS or copy an IFR clearance, it goes straight onto paper. When I make that ground call, my eyes are on the kneeboard, reading the exact information I just wrote down.
5. Taxi Out (Digital: iPad) ForeFlight reclaims the throne here. For situational awareness on the ground, a geo-referenced airport diagram on a bright screen is simply superior.
6. Before Take-Off (Digital: iPad) Standard run-up procedures and final engine checks belong to the iPad checklist.
Phase 3: In the Air
7 & 8. Climb and Cruise Checklists (Physical: Memory + Kneeboard Quick Ref) Once airborne, eyes need to be outside. I run these checklists from memory, backed up instantly by the quick reference on my kneeboard. This “quick ref” approach provides massive confidence. I don’t have to tap a screen, wake up a device, or navigate menus. I just point my finger at the paper, confirm the item, and move on.
9. Enroute Nav / Traffic (Digital: iPad + Sentry or G1000) Technology wins the cruise phase. Whether I’m using ForeFlight with a Sentry or a G1000 MFD, the digital traffic alerts are invaluable. Sure, the system occasionally produces a ghost or a hallucination, but it still spots traffic miles before my human eyes do, getting me looking in the right general direction.
10. Instrument Approach (Digital: iPad) I will happily complain about ForeFlight charging a premium subscription tier just to show the little blue airplane icon on the approach plate. I hate paying for it, but I will never fly an approach without it. The situational awareness is unparalleled.
11 & 12. Before Descent and Before Landing (Physical: Memory + Kneeboard Quick Ref) The workload is spiking again, so the iPad becomes a map, and the checklist reverts to the analog kneeboard. A quick glance down at the paper confirms my memory flows for descent and landing configuration.
Phase 4: Arrival
13. Taxi In (Physical: Paper Kneeboard) Back on the ground, the pencil comes back out. I write down the taxi instructions. Some might argue that GA airports don’t have complex taxiways, but the ones I fly into certainly do. Writing it down prevents runway incursions and awkward conversations with Ground control.
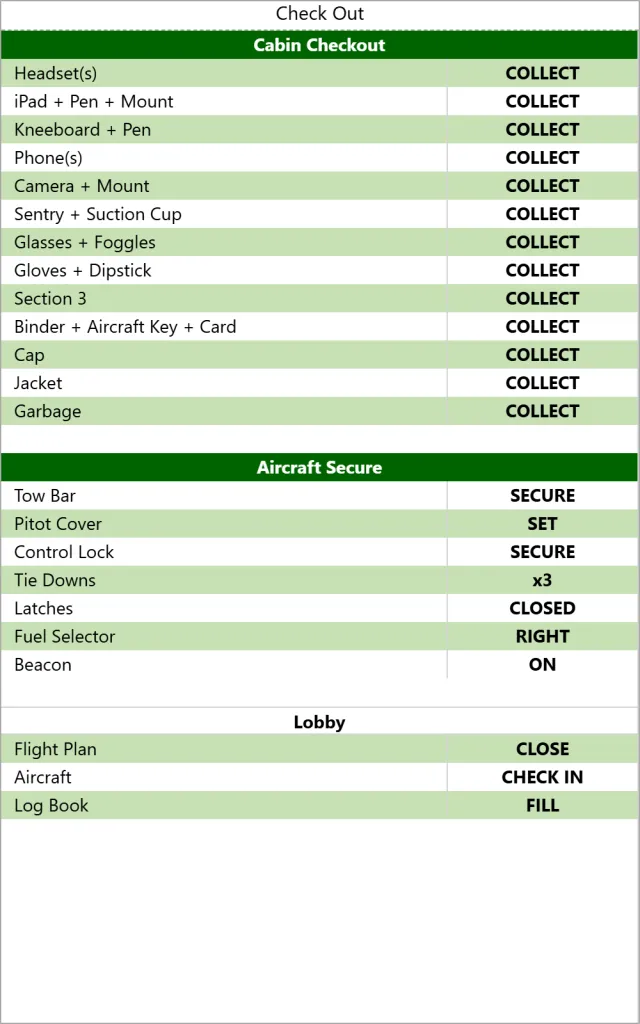
14. Parking (Physical: Laminated, Green Accent) This final green-themed checklist doesn’t look like much, but it was written in sweat. I cannot easily admit how many times I secured the aircraft, drove all the way home, only to realize I left the aircraft key in my pocket. This physical list ensures the plane is tied down, the Hobbs is recorded, and the keys end up where they belong.
The Final Score
When you look at the entire flight, the tally is 8 physical to 6 digital.
The iPad does the heavy lifting for navigation and situational awareness, but the physical tools—the color-coded laminates and the custom-tailored paper kneeboard—manage the workflow, capture the active data, and save me from myself.
That is the essence of the hybrid cockpit. It’s not about choosing a side; it’s about choreographing a safer, smoother flight.
Appendix : References
If you want to customize your workflow from my templates, checkout the following
- Preflight Kneeboard : https://www.kneeboard.ga/?t=7H
- C182 Flight, https://www.kneeboard.ga/?t=55 which has instrument departure
