
Airport Tile Guide
Overview
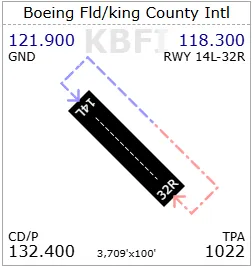
Airport Tile is the most popular tile in GA Kneeboard for good reason—it was the first tile created and packs comprehensive airport information into a compact, customizable format. Whether you’re planning a flight or need quick reference during operations, the Airport Tile shows everything from radio frequencies and runway information to traffic patterns and custom data fields.
Airport Tile Structure
At a glance, each Airport Tile displays:
-
Airport Name at the top
-
Airport Code as a watermark
-
Runway Sketch with traffic pattern overlay
-
Runway Dimensions at the bottom
-
Corner Data Fields (4 fields in single mode, 8 in wide mode) showing customizable information
Getting Started
Adding an Airport Tile
The Airport Tile comes by default in the VFR Flight Demo template, which you can use as a starting point for your own templates. To add a new Airport Tile:
-
Eject the current tile (if replacing an existing one)
-
Click on “Airport” tile type
-
The Airport Tile will appear, ready for configuration
Accessing Settings
You can enter settings mode in two ways:
-
Click anywhere on the tile header
-
Click the gear icon
This opens the airport settings configuration panel.
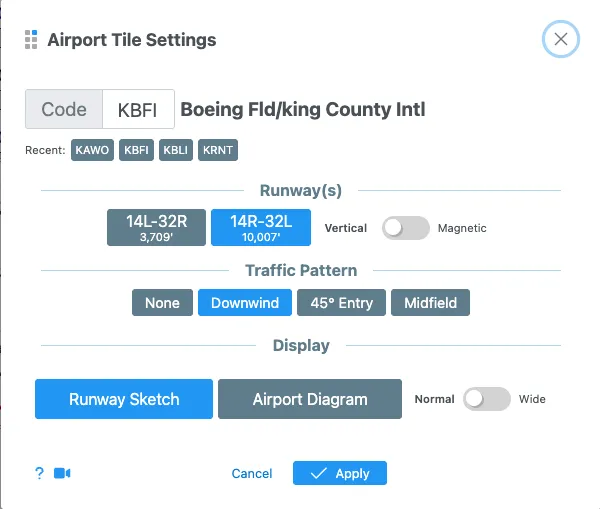
Configuring Your Airport Tile
Selecting an Airport
Airport Code Field: Enter the 3 or 4-letter airport identifier (e.g., KBFI, KPAE)
Recent Airports: The system remembers your five most recently used airports. Simply click on any airport from this list to quickly switch without retyping the code.
Choosing a Runway
Select your runway from the dropdown menu, which displays:
-
Runway designation (e.g., 16L/34R)
-
Runway length
You have several runway selection options:
Single Runway Selection
Choose one specific runway for detailed display.
Multiple Runway Selection
NEW FEATURE: You can now select two runways to display side by side. This is perfect when you’re not sure which runway you’ll be assigned. The runways will appear next to each other on the tile.
Tip: Select runways in the order you want them to appear. For example:
-
Click 34L first, then 34R second to display them left-to-right in the correct geographic orientation
-
This maintains intuitive, prototypical layout that matches reality
Runway Display Orientation
Choose how the runway is visually represented:
Magnetic: Displays the runway at its actual magnetic orientation
-
Shows the runway angle as it appears in reality
-
Example: Runway 02/20 at Bremerton shows at an angle
-
Best for geographic awareness
Vertical: Aligns the runway vertically regardless of actual orientation
-
Runway always appears top-to-bottom on the tile
-
Useful for standardized display
-
Great when space is limited
Traffic Pattern Overlays
Traffic patterns help you visualize entry procedures and circuit orientation. Choose from four display options:
None (Hidden)
-
Clean, minimal layout
-
No traffic pattern display
-
Provides maximum space for notes or other information
Downwind Only
-
Shows the downwind leg with directional arrow
-
Blue arrow = Left traffic pattern
-
Red arrow = Right traffic pattern
-
Useful for airports with preferred runway sides
45-Degree Entry
-
Displays the standard 45-degree entry to the downwind leg
-
Shows entry angle and pattern direction
-
Most common traffic pattern entry method
Midfield Crosswind (Teardrop)
-
Shows the midfield crosswind/teardrop entry
-
Creates a distinctive “heart shape” pattern
-
Includes theoretical crossing heading
-
Shows the perpendicular heading for crossing midfield
-
Based on runway orientation
-
Example: “Fly heading 074 to cross midfield”
-
Use as a guide, not absolute reference
-
Important Note: The theoretical headings are calculated based on runway orientation and provide good guidance, but always follow local procedures and account for wind conditions.
Display Modes
Runway Sketch (Default)
The standard view showing a simplified runway diagram with:
-
Clear runway outline
-
Traffic pattern overlay
-
Easy-to-read dimensions
-
Best for most operations
Airport Diagram
Displays the official airport diagram:
-
Shows all runways in their relative positions
-
Indicates taxiways and airport infrastructure
-
Displays tower location (when available)
-
Shows lighting information symbols
- Example: Pilot-controlled lighting indicators
-
Less legible than sketch view due to size
-
Useful for:
-
Understanding airport layout
-
Locating tower or ramp areas
-
Checking lighting availability
-
Comparing multiple runway positions
-
Note: The airport diagram provides an overview but does not replace approach plates for detailed airport information.
Customizing Corner Data Fields
Each corner of the Airport Tile can display different information relevant to your needs. This is where you “do your own cooking” and configure the tile to work for you.
Single Tile Mode (4 Corners)
Click on any corner to open the field selector and choose from options including:
-
Airport Elevation
-
Tower Frequency
-
Ground Control
-
ATIS/AWOS
-
Unicom
-
And many more…
Custom Values
You can also enter custom values for any corner field:
-
Click on a corner field
-
Enter your custom information
-
Example: “Tower Hours: 7AM - 9PM”
-
Example: Custom notes or reminders
-
-
Your custom value will appear in that corner
Tip: Custom fields are perfect for:
-
Operating hours
-
Local procedures
-
Personal reminders
-
Temporary NOTAMs
Wide Mode (Merged Tiles)
NEW FEATURE: Enable Wide Mode to get additional data fields and enhanced display.
Activating Wide Mode
In the display settings, select “Wide” mode. Your single tile will stretch across two tile widths, providing:
-
8 corner fields instead of 4
-
More space for runway display
-
Room for additional custom information
Side-by-Side Comparison
You can place multiple Airport Tiles next to each other to compare different airports or configurations:
Example: Display Boeing Field (KBFI) on one tile and Paine Field (KPAE) on another tile for quick comparison of:
-
Frequencies
-
Runway dimensions
-
Traffic patterns
-
Elevation differences
-
Custom notes for each airport
Each tile maintains its own corner field configuration, so you can customize them differently based on what matters most for each airport.
Best Practices
Template Organization
-
Use the VFR Flight Demo as a starting point
-
Arrange tiles in the order you’ll reference them during flight
-
Consider your typical flight profile when choosing corner fields
Corner Field Selection
-
Choose fields based on your flight phase (departure, enroute, arrival)
-
Common combinations:
-
Tower, Ground, ATIS, Elevation
-
Unicom, CTAF, Elevation, Custom notes
-
Ground, Tower, Clearance Delivery, ATIS
-
Traffic Pattern Configuration
-
Use 45-degree entry for standard operations
-
Switch to Midfield Crosswind when required by local procedures
-
Hide patterns when you need a cleaner view for notes
Wide Mode Use Cases
-
When you need to see many data fields at once
-
For airports where you need extensive frequency information
-
When displaying complex traffic pattern information
-
For airports requiring custom notes and standard fields
Multiple Runway Display
-
Use when weather could affect runway assignment
-
Select runways in geographic order (left to right) for intuitive display
-
Helpful at airports with parallel or crossing runways
Evolution and Feedback
The Airport Tile has evolved significantly over the past two years based on user feedback. GA Kneeboard continuously improves based on real pilot needs and suggestions.
We Want Your Feedback: If you have ideas for improvements or features that would make the Airport Tile more useful, please submit your feedback through the app. Your input directly shapes how this tool develops to better serve the aviation community.
This guide reflects the latest Airport Tile features and capabilities. For additional help or questions, visit the GA Kneeboard support resources or submit feedback through the application.